Malware Lab
Updated 11 Mar 2021: With some changes to the functions in Windows 10, version 2.0 of my LabNet script, and some clarifications suggested, I’ve updated this post to match the new steps.
The blog post that goes along with this can be found here.
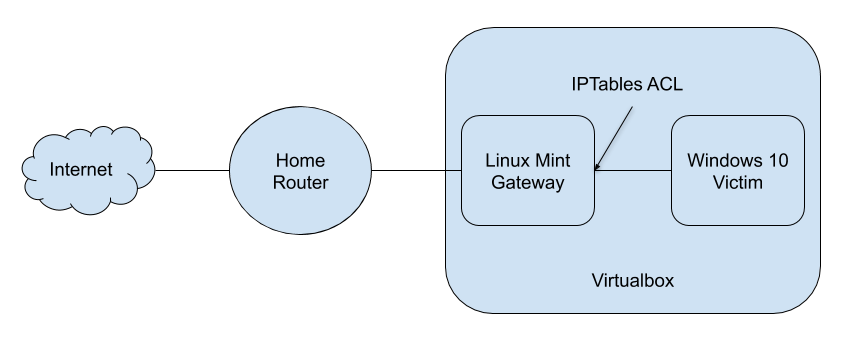
Logical diagram
Host Machine
- Install Virtualbox
- https://www.virtualbox.org/wiki/Downloads
- Open command prompt
vboxmanage dhcpserver add --netname Lab --ip 10.0.1.1 --netmask 255.255.255.0 --lowerip 10.0.1.2 --upperip 10.0.1.10 --enable
Linux Mint Gateway
VM setup:
CPU: 2 cores
RAM: 2 GB
HD: 32 GB
Network: Set up 2 NICs. The first set as NAT, the second as Internal (named Lab)
Enable: Shared Clipboard, Drag and Drop
- Install Linux Mint and all updates
- Download and install https://linuxmint.com/download.php
- When creating the user account, select to Log in automatically
- Once installed and running, open a terminal
- Run
sudo apt update && sudo apt upgrade - Click the Linux Mint start menu, and type Screensaver
- Change “Delay before starting screensaver” to Never
- Reboot
- Download and install https://linuxmint.com/download.php
- Virtualbox Guest Additions
- Virtualbox menu > Devices > “Insert Guest Additions CD image”
- Run the installer
- Virtualbox menu > Optical Drives > Remove disk from virtual drive
- Snapshot
- Linux Mint menu > Quit > Shutdown
- Virtualbox > Snapshot named “Fresh install”
- Start VM again
- Install software:
- Tools via APT:
sudo apt install wireshark python3-pip- Wireshark: Choose yes when asked to allow non-super users capture packets
- Oletools:
sudo -H pip3 install oletools- If there are errors try running first:
sudo -H pip3 install --upgrade setuptools
- If there are errors try running first:
- Tools via APT:
- Snapshot
- Linux Mint menu > Quit > Shutdown
- Virtualbox > Snapshot named “Software installed”
- Start VM again
- LabNet setup
- Follow the setup instructions on https://github.com/netsecninja/LabNet
- Snapshot
- Linux Mint menu > Quit > Shutdown
- Virtualbox > Snapshot named “Baseline”
- Start VM again
- Run Labnet and select “Actual Internet” in preparation for setting up the Windows VM
Windows 10 Victim
VM setup:
CPU: 2 cores
RAM: 2 GB
HD: 32 GB
Network: Internal (named Lab)
Enable: Shared Clipboard, Drag and Drop
- Install Windows 10
- https://www.microsoft.com/en-us/software-download/windows10ISO
- Download oldest version available (less patches means more vulnerable for testing!)
- Click “I don’t have internet” during the install to bypass having to log in with a Microsoft account
- Set your local timezone
- Install VM Guest tools, then remove tools disk from virtual drive
- Snapshot
- Start menu > Power > Shutdown
- Virtualbox > Snapshot named “Fresh install”
- Start VM again
- Disable patches
- Right-click network icon in task tray > Open Network & Internet settings
- Click on “Properties” for Ethernet
- Enabled Metered connection
- Set up Networking
- Right-click network icon in tray, Open Network & Internet Settings
- Change adapter options
- Right-click Ethernet > Properties
- Double-click on IPv4
- Set Primary DNS to 1.1.1.1 and Secondary to your Linux Mint Lab IP
- Click Advanced
- Add Default Gateway, enter your Linux Mint Lab IP
- Click OK to close all the screens
- Set up Polar Proxy cert
- On Linux Gateway, run labnet and choose “Actual internet with SSL interception”
- On Victim: Open IE, <Linux Mint Lab IP>:10080, and open the downloaded .cer file
- Install the Certificate in “Trusted Root Certificate Authorities” folder
- On Linux Gateway, Use Ctrl-C to stop the SSL interception, run labnet again and choose “Actual internet”
- Autologin
- Open IE, go to https://live.sysinternals.com/Autologon.exe and choose Run
- Add the user password, and click Enable
- Reboot
- Install Notepad++
- Install 7-zip
- Install Sysmon
- Download files to Victim and unzip
- Open PowerShell as an Admin, change into unzipped directory
- Run
set-executionpolicy bypass - Run
./install_sysmon.ps1 - Open Event Viewer > right-click on any folder > “Create Custom View”
- For the By Log - Event Logs dropdown, enter “Microsoft-Windows-Sysmon/Operational”, and click OK
- Name it Sysmon, and click OK
- Install Wireshark
- Download Procmon
- Create a “Tools” folder on your Desktop, save Procmon in there
- Run Procmon
- Options > Disable “Show Resolved Network Addresses”
- Options > Select columns > Add “Thread ID”
- Close Procmon
- Install Graphviz (Prereq for ProcDOT)
- During install, select “Add Graphviz to the system PATH for all users”
- Install Winpcap (Prereq for ProcDOT)
- Download Windump (Prereq for ProcDOT)
- Save in your Tools folder
- Install ProcDOT
- Unzip in your Tools folder
- Zip password: procdot
- Navigate to Tools\Procdot\win64, and run procdot.exe
- Set WinDump path
- Set Graphviz dot.exe path (C:\Program Files\Graphviz\bin\dot.exe)
- Close ProcDOT
- Install Office or LibreOffice
- Install Python
- Make sure to check the “Add Python to Path” box during install
- Install OLETools
- Open a Command prompt as admin and run
pip install oletools
- Open a Command prompt as admin and run
- Disable sleep
- Start > Power & sleep settings
- Under Screen change both Battery and Plugged In to Never
- Create shortcuts in Tools folder for:
- Wireshark (C:\Program Files\Wireshark\wireshark.exe)
- Procdot.exe (Tools\Procdot\win64\procdot.exe)
- Event Viewer (Start > Event Viewer > Open File Location > COPY the shortcut)
- Snapshot
- Start menu > Power > Shutdown
- Virtualbox > Snapshot named “Baseline”