Building a Malware Analysis Lab
There are a wide variety of methods and tools to use in a malware analysis lab, depending on what you want to be able to do. I’d like to share how I’ve created mine and explain some of the features. My lab is used for some basic static analysis and well-rounded dynamic analysis, while leveraging the power of Virtual Machines (VM). I have used this setup on my daily driver laptop, a stand-alone Out-Of-Band laptop for work, and a dedicated VM server I have at home.
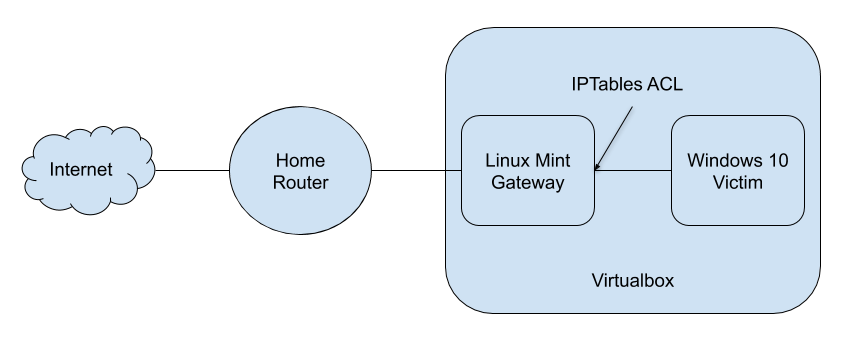
My lab has a Windows 10 victim VM with some basic security and analysis tools installed. I also have a Linux-based network gateway which all traffic from my victim machine will route through. The gateway has iptables rules in place to prevent the victim from accessing the rest of my home network. While this isn’t as secure as physical separation, it works for me and I accept the risks. I have tools and scripts installed that allow me to monitor/capture network traffic, including SSL decryption, as well as simulated internet services if I need to analyze targeted malware or wish to prevent attackers from knowing the malware is being analyzed. The step-by-step directions for how I set up my lab can be found on this page.
Hypervisor
I choose to use VirtualBox, as it’s free and has all the features I enjoy and use. Using VMs means I can create snapshots before malware analysis, and revert once I’ve collected the data I need. The drag-and-drop and shared clipboard feature makes it easy to transfer data to and from the VMs if needed, and you can also set unidirectional transfer if you are worried. In this set up, I use NAT networking for the gateway’s external NIC, and Internal networking for the victim and gateway lab NICs. While there is always the possibility for a VM escape from more advanced malware, I have yet to see this in the wild from samples I’ve analyzed. If you are worried about that, you can always use a stand-alone box dedicated to your lab.
Windows 10 Victim
At the heart of my lab is my Windows 10 VM. Microsoft provides the ISO download for free and does not require activation, given you are willing to accept a few caveats like a watermark on the screen and limited personalization options. In my opinion, this is perfect for a lab VM! Of course you can use an activation key if you have one, or there is a great article on Tom’s Hardware on cheap purchasing options.
In my setup, I’ve disabled automatic updates and Windows Defender. On top of this OS, I’ve installed several tools that allow me to do static and dynamic analysis:
- 7-Zip - The swiss army knife for compressed files
- Python - Because who doesn’t love scripting, and it’s required for the next tool
- OLETools - Used for static Microsoft Office document analysis
- LibreOffice - I’m too cheap to buy MS Office, but sometimes you just need to open a document to look at it. Any macro analysis is done through OLETools.
- Notepad++ - Best editor out there, great for all sorts of analysis tricks
- Sysmon - Improved logging of Windows events, process creation, network connections, filesystem activity, etc
- Wireshark - De facto standard tool for packet capture and analysis
- Procmon - A powerful process monitoring tool logging process actions including file and registry changes
- ProcDOT - A third party app that combines Wireshark capture data and Procmon output to create a graphical process map
Linux Mint Gateway
Protecting my home network (or whoever’s network I’m on) from any possible worming malware or lateral movement, I have a Linux Mint VM. This serves as the firewall/router for the victim, while allowing additional external tools for better network context and capturing IOCs. On this install I also have 7-Zip, Python, and OLETools, because sometimes Linux is just better at somethings, and maybe I only need to spin up one VM for a quick analysis. Yes, you could enable the Linux Subsystem in Windows, but that feels like sacrilege.
Here’s the additional tools I have installed:
- Polar Proxy - SSL decryption proxy, since most malware payloads/C2 are done over SSL connections
- Wireshark - Needed to review packet captures from Polar Proxy
- InetSim - Simulated internet services, without any real internet connections
While you could use a Debian install and skip the desktop environment, having the ability to use Wireshark over a commandline-focused tcpdump is a huge improvement, and also makes drag-and-drop from your host machine the best way to transfer files if needed.
I use iptables to limit what the victim VM can connect to, specifically rejecting any traffic to any internal non-routable IPs except my lab subnet. The iptables are also used to forward traffic to either the internet or Polar proxy, and can be cleared out if InetSim is used. I created a labnet.sh script to swap out the ipfilter rules to allow the victim machine direct access to the internet, SSL decrypted traffic, or simulated internet. If you are worried about your internal network, you can always put your lab on the DMZ if your router has that option, or use a hotspot.
Conclusion
In the end, I’ve created this setup for the type of malware analysis that I do. You can certainly add or swap out any of the tools for the type of work you need. I have a page set up with the step-by-step instructions of how I set up my lab, as well as links to the labnet script and iptables profiles. The beauty of this set up is I can make clones of the Win10 box, and/or put a Kali attack VM along side. I hope this post explained the hows and whys of my lab set up, highlighted some of it’s useful features, and gave you some ideas of what you can do with a lab of your own.